Per the instructions: “We recommend fan (24VDC) cooling and heatsink at 2A or more. The wiring diagram has a suggested heatsink from 1/8” aluminum flat stock.”
We suggest you insert the driver IC’s into the PC board, and screw the driver ICs to the heatsink before soldering. This will eliminate any stresses on the driver IC leads and package. The heatsink is marked where to drill the holes if you install the heatsink before soldering. If you install the heatsink after you have soldered-in the driver ICs, you will need to mark your own holes.
Heatsink compound (thermal paste) is also strongly recommended before attaching the heatsinks.
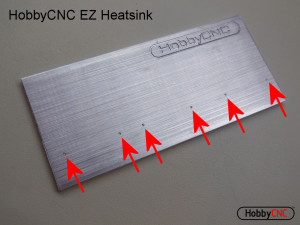
HobbyCNC EZ Heatsink
The HobbyCNC EZ ships with a 2″ x 4.5″ x 1/8″ aluminum heatsink (Fig 1) and (6) 4-40 machine screws. The heatsink is marked for drilling and tapping (Figure 1, red arrows, drill & tap 4-40) if you install the heatsink before soldering the driver ICs. If you’ve got the drivers already soldered-in then you will need to mark and drill holes to match where the IC’s ended-up.

Figure 1 – Drill and Tap (6) places – Use these marks ONLY if installing the heatsink BEFORE soldering in the driver ICs.
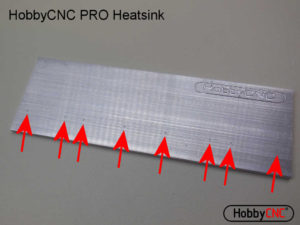
HobbyCNC PRO Heatsink
Optional HobbyCNC PRO, 2″ x 6.25″ x 1/8″ aluminum heatsink (Fig 2) and (8) 4-40 machine screws. It is marked for drilling and tapping (Figure 2, red arrows, drill & tap 4-40) if you install the heatsink before soldering the driver ICs.Watch the video on installing the driver chips and heatsink. If you’ve got the drivers already soldered-in then you will need to mark and drill holes to match where the IC’s ended-up.

Figure 2 – Drill and Tap (8) places – Use these marks ONLY if installing the heatsink BEFORE soldering in the driver ICs.
If you want to make your own heatsink, here is a drawing with the hole center dimensions. Make the heatsink first (if possible) and attach the driver IC’s before soldering. HobbyCNC PRO_Heatsink drawing.
