

3D Printed Fret Buttons
From HobbyCNC
We now offer 3D printed fret buttons designed specifically for HobbyCNC mechanical fret boards.

Modifying Fret Buttons

Photo courtesy of James P.
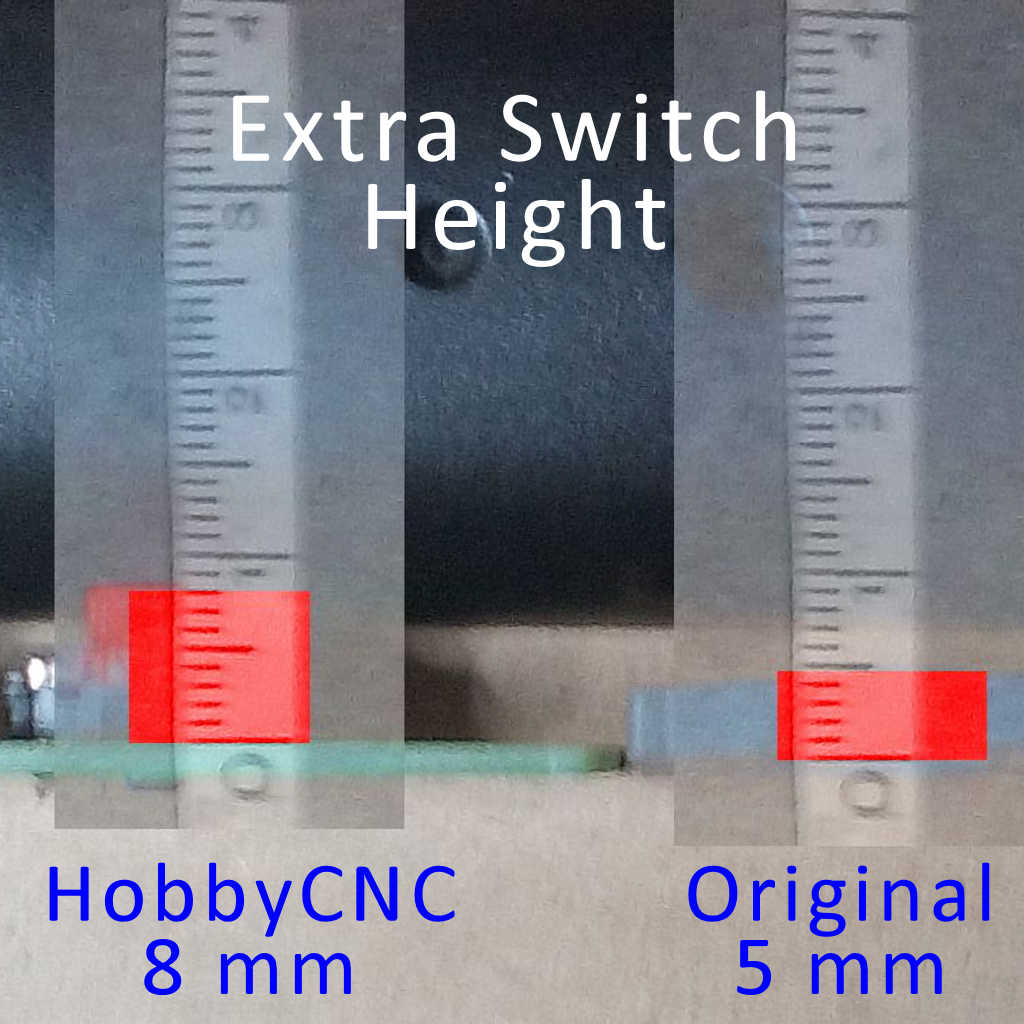
Since the HobbyCNC Fret Boards are from 1.5-3 mm taller than the stock membrane switch, you will need to remove some material from the back of the fret button. Here’s some feedback from customers and other ideas on how to accomplish this.
In Figure 1, James P. did an outstanding job clearly showing the difference in height between HobbyCNC (left) and ‘stock’ (right).
You will need to check for yourself and calculate how much material needs to be removed from the back of your particular fret buttons.
The more tools you have access to, it’s more likely this task will be easier!
Method to determine how much to remove
Measuring the Gap
Place the top half of your guitar neck face-down and insert the fret buttons. (Figure 1)
Make sure to raise the guitar neck off the table with some spacers such that the fret buttons are seated all the way down.
Rest the HobbyCNC Mechanical Fret board, buttons-down onto the fret buttons. Don’t apply any pressure. (Figure 2)
You might wish to insert the screws at either end but do not tighten! You are only using the screws to stop the board from falling off during the next step.
Now either turn the whole thing a little bit or bend down to look at the underside of the PC board.
Look at each end, where the PC board will finally rest when you put this all back together.
The gap (red arrows and lines, Figure 3) will give you an idea how much you need to reduce the underside of the fret buttons. Click on the image to see a larger view.
I have no idea why the gap is larger on one side than the other – but then again, I didn’t spend any time to figure it out.


Fret Buttons Modified
There is no need to remove the material perfectly to the edges of the fret buttons. Look at the switch on the HobbyCNC replacement fret board, and you will see that there is actually a pretty small ‘contact area’ between the switch and the fret button.
Note: I have not done this, so I can’t say if the button will behave or feel any different with the extra weight of the epoxy. If you try it, let me know!

Remove too much?
You can always ‘backfill’ the inside of the switch with some epoxy (or similar) that will flow evenly into the switch, trying to get the level to exactly where you need it.
Close-up of the finished product
Here is a nice close-up photo of one fret button, showing the amount of reduction compared to the clever measuring strip.

Ready to finish-up
The fret buttons have all been modified and the HobbyCNC replacement fret board is ready to be soldered to the cable and the whole thing put back together again.

And . . . Ready to Play
Here’s another reason I appreciate help from my customers. There’s no way in hell I’d ever be able to play this fast!!
Other Modification Ideas
Use all of these suggestions at your own risk. I am only sharing ideas. I make no guarantee that the following approaches will work for you or your guitar. You’ve been warned!
Remember, these are just ideas in this section. These have not been tried, that I know of. Anytime you are using tools, please take every precaution. You don’t want to play Guitar Hero with less than 10 fingers, if you can help it!
- Soldering Iron
- Drill Press. Put an end-mill or flat-bottom router bit in a drill press, and set the maximum depth-stop on the drill. Be DAMN CAREFUL and keep you fingers away from the button and the bit. If the mill were to grab the button and rip it away from you, you do not want your fingers to follow.
- Xacto knife. This one scares me a LOT. I’d suggest not trying this. Potential safer approach, heat the blade with a candle first? (I did say safer, not ‘safe’!)
- Sand Paper. From aWiseMoose on Reddit: I used sandpaper and sanded off material by hand. This is very labor intensive, inaccurate, and can definitely be improved. I’ve been thinking of making a mold, or a “template” of sorts, to make this process easier and more uniform. My idea is to have a mold where you place the fret in, top side down, and the amount of material you need to get rid of would stick out past the top of the mold. Basically, you’d sand/saw/mill the fret until you hit the top of the mold and the fret button is flush with the mold. It might even be good to have a mold of all 5 frets so all frets can be worked on simultaneously.
- Trim the supports. From bobreact on Reddit: Just installed on a Les Paul. Worked perfectly first try. I filed the inside of the ‘back’ of the neck to make room for the PCB. Highly recommend doing this. The two screws that hold the PCB to the front half of the fret board provide enough strength to keep it in place. And unless you are playing like Herman Li you shouldn’t be pushing the buttons hard enough to warp the PCB. That is my thinking behind not adding spacers. Time will tell. I just used a triangular wood file and brought all of the round pegs and straight edges on the inside of the back half of the neck down about 1/4”.
