

Guitar Hero Mechanical Fret Button Upgrades
On a standard Guitar Hero type guitar, the fret buttons (red, green, yellow, blue, orange) sit above a silicon membrane.
The membrane contains two conductive electrical pads. (see figure 2). This all sits on top of a small printed circuit board that has matching conductive traces that align with the conductive pads on the silicon membrane.
When a fret is pressed down, the membrane deforms, allowing the pads on the membrane to contact the mating pads on the printed circuit board, and the electronics are able to register the keypress.
To see the way the fret buttons ship from the factory, we need to open up the neck of the guitar.
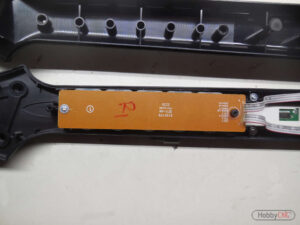
In figure 1, the back of the guitar neck has been removed. For this guitar (World Tour), there are 8-10 T-10 torx screws holding it together. The ‘bottom’ of the printed circuit board is now visible, held in place with two screws, one at each end, and a ribbon cable that attaches the board to a connector at the guitar-end of the neck.

Take a look toward the top of figure 1, which is the inside of the back of the guitar neck. See that row of round cylinders sticking up? Those rest against the printed circuit board to prevent it from flexing while you are fingering the frets.
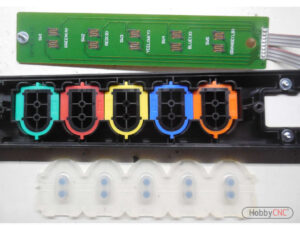
The two screws have been removed in figure 2, and the printed circuit board has been flipped-over to expose the ‘top’ (the business end). The clear/white silicon switch membrane can be seen, still in place, above the fret buttons. There are five pairs of black, conductive circles that normally ‘float’ above the printed circuit board until you press the fret down with your finger.
When those two black dots meet the ‘zig-zag’ conductive lines printed on the circuit board, the circuit is completed and the electronics can tell which button is pressed.
Figure 3 shows the silicone switch membrane was removed (and flipped over) revealing the colored fret buttons. These buttons just ‘sit’ in their holes in the guitar neck.
That’s it. A circuit board, a silicon membrane switch and a fret button. Inexpensive, and easy to mass produce and assemble in huge numbers.
What do the existing fret buttons look like?
Why would you want to make the change to mechanical fret buttons?
There are a couple of reasons why a player would want to make a change to ‘mechanical’ fret buttons.
Feel. Some players prefer the feel of a real switch over the feel of the silicone membrane. There are many websites that show how to make the fret buttons ‘easier’ or ‘softer’ to push by strategically poking holes with a sewing needle around the perimeter of each switch, like this guy (YouTube Video). This has the effect of ‘weakening’ the silicon around each switch, allegedly providing for an easier ‘press’. I haven’t tried it, but the cost to experiment is pretty low!
Bad fret. Sometimes one (or more) fret buttons will begin to act-up, or stop working entirely. Solutions include disassembly and cleaning the circuit board with a pink pencil eraser to remove any ‘stuff’ that may interfere with good conduction between the circuit board and the silicon membrane switch. Another potential fix is to move the circuit board closer to the frets by placing duct tape on the ‘bottom’ of the printed circuit board (remember those spacers at the top of Figure 1?). Like this well documented instructions here (Instructables). Again, I haven’t tried this approach, but like the pin-prick approach, the cost is nothing.
Reliability. Although good, the membrane switches can work most of the time, but still miss some notes. Who knows why?
What’s the deal with the existing fret buttons?
This approach of using a flexible membrane and conductive pads is a super inexpensive method of making thousands-and-thousands (millions even?) of products that work well and are easily mass produced. There are the bare minimum of moving parts and zero alignment/assembly issues.
What are “mechanical fret buttons”?
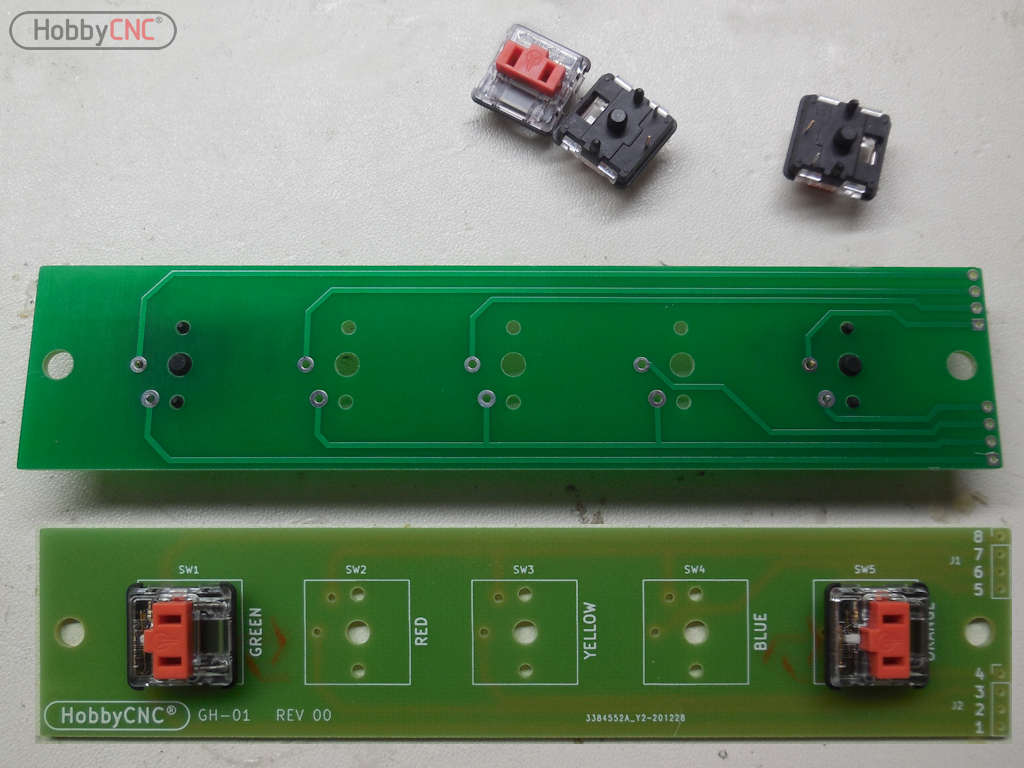
As the name implies, this is the substitution of the membrane switch with a good old-fashioned switch. Typically, the switches used are low profile keyboard switches used in laptop PCs. They have a good ‘feel’ and are as reliable-as-hell. They can take millions of presses with no issues.
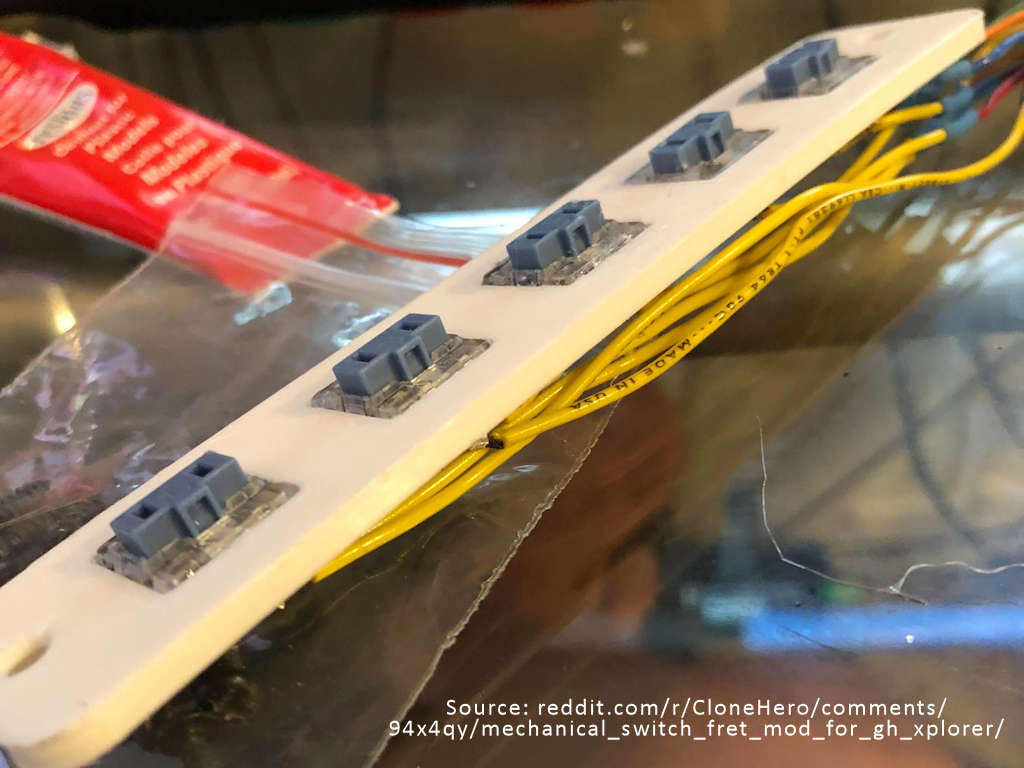
The trick is to find a switch that is small enough to fit in the same space as the (quite thin) silicone membrane. No small task, most solutions require some adaptation of the guitar neck or the fret buttons to work.
Figure 2. The circuit board was removed (two screws) and flipped over bottom-side-up. The silicon switch membrane is still in place over the buttons. The two black dots on the membrane make contact with the ziggy-zaggy lines on the printed circuit board when the fret button is pressed.
Are all Guitar Hero fret PC boards the same?
Sadly, no. That would make everything easier. Board sizes change, mounting hole diameters and spacing change, connectors change, and, most importantly, the wiring of the switches changes.
We offer 18 boards so far. Go to our Selection Guide page to find your guitar and see what boards are compatible.
What if I don’t see my guitar or game console listed?
First, check the Selection Guide page and see if, by chance, any of the existing boards will work. If they do work, please let me know so I can update the matrix!
If there is no match in the selection tool, then submit a support ticket. I’m interested in expanding the product offering. If I decide to make a new board, I would need you to send me the circuit board from your guitar, along with the console type and guitar name/type. A link to a photo of the type of guitar is also necessary. I’m not interested in buying one of every possible type of guitars! If I do make a version to match what you sent me, I’ll send you a free board (with switches) for you to test.