HobbyCNC & Mach3 Software Configuration
HobbyCNC Board kits are fully compatible with the Mach3 software by Newfangled Solutions.
Note Mach3 is very flexible. I am only going to discuss those parts of the configuration that address driving my board.
- Download a copy of the Mach3 CNC Controller Software Installation and Configuration from machsupport.com/help-learning/product-manuals. It is a very well written and thorough guide. For the rest of this discussion, I will be referring to Version 3 of this manual.
- Read Chapter 4 Hardware Requirements and Connecting the Machine Tool. Pay particular attention to 4.1 (The PC Parallel Port and its History) and 4.2 (Logic Signals).
- It is worth knowing 4.4.3 (How the Step and Dir Signals Work) and all of 4.5 (Limit and Home Switches).
- The real important stuff is in Chapter 5 Configuring Mach3 for Your Machine and Drives.
- Section 5.3.1 (Axis and Spindle Output Signals to Be Used) is where you tell Mach3 what pins to use for the Step and Direction signals for each axis. In red are the pins for the HobbyCNC PRO board.
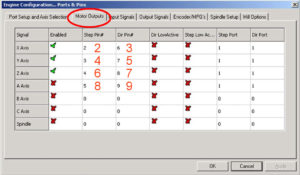
Mach3 Motor Outputs Screen
- Next, study Figure 5-4: Input Signals Tab on the Ports and Pins Dialog. This is where you configure the input signals coming in from TB5 of the HobbyCNC PRO board. The numbers silk-screened in front of TB5 is what you will use when configuring this screen.
- Now move to section 5.5 Tuning Motors, especially the setting of the maximum speed and the acceleration/deceleration rates. For starters, turn down the acceleration/deceleration and maximum speed. You can then experiment with these numbers based on your system.
- Section 5.3.1 (Axis and Spindle Output Signals to Be Used) is where you tell Mach3 what pins to use for the Step and Direction signals for each axis. In red are the pins for the HobbyCNC PRO board.
I don’t use Mach3, so please let me know if your experience differs from the above.